How to Prevent and Adjust Chain Rubs On Front Derailleur
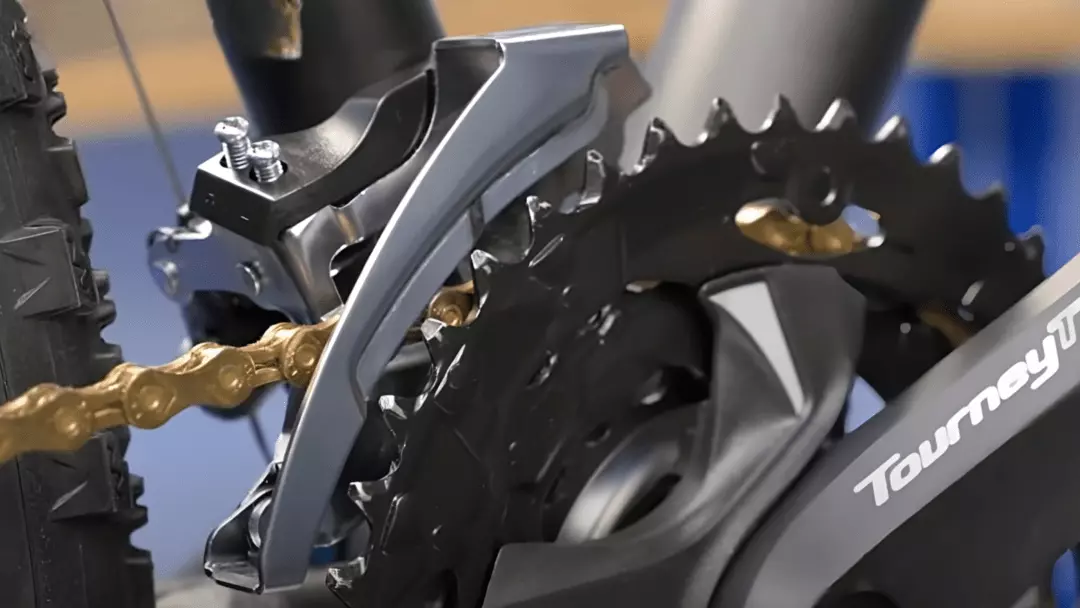
Front derailleurs, despite the fact that they have fewer gears than rear derailleurs, nevertheless require regular maintenance and care.
The chain can snag on the front derailleur at any given moment while riding your bike. Chain rubbing can be avoided in the future if you know how to avoid chain rubs on front derailleur.
As a bike owner, you understand the importance of avoiding this type of extra trouble. If this occurs right now, you will need to adjust the chain. As a solution, after loosening the cable adjuster bolt, you’ll need to tighten the front derailleur, gear, and shifting gear before tightening the cable adjuster bolt again.
If you’re looking for ways to avoid chain rubbing or quick fixes for chain rubs on front derailleur, this article may help.
Causes of Chain Rubbing
Before we get into the discussion of how to prevent and adjust the issue, it’s important to talk about the causes of this problem first. There are a few possible reasons for chain rubs. We talk about them below.
Crankset Problem
The crankset of the bicycle does not usually mesh with the chain. Maybe the crankset is worn out. For this reason, sometimes chain rubs happen. The issue is either the largest cog or the smallest cog causing bad shifting.
Loose Chain
A loose chain is one of the main reasons for chain rubbing. The problem with the inner ring or middle ring is that they may make the chain slightly loose.
Quality Issue
Due to quality reasons, the steel ball inside the axle may get broken. This is also a big issue for chain rubbing. The smallest cog and smallest chainring teeth may cause a road bike to change gear.
A Wrong Model with Cable Tension
The new chain may not fit with the cable tension, making it misaligned with the sprockets. The wrong model of chain can also cause this problem.
Highest Gear at the Back
When the chain is on the final few gears at the back, the chain rubs against the front derailleur cage. The largest ring turns clockwise with the gear cable and causes cross-chaining.
Wheel
When the freewheel base or flywheel is loose, this can cause the sprocket of the flywheel to sway, making the chain rub.
Old Chain
The chain may have exceeded its service life, and the elongated outer chainring will lengthen when pedaling hard. So, this can also create problems of chain rub on the front derailleur.
Old Wheel with New Chain, Not Inline
Sometimes, the old wheel of the new chain may not come in line with the teeth. The old teeth of the rear wheel will cause the chainrings to rub the derailleur.
These issues are common in bicycles, bikes, and mountain bike chains. Rubbing on the front derailleur is the same for every single one of them. An inline adjuster is a great tool to stop rubbing and cross-chaining.
Also Read: Bike brake rubs on one side
How to Fix Chain rubs on Front Derailleur
In this part of the article, we will give you a step-by-step guideline for fixing chain rubbing on the front derailleur.
Loosen the Cable Adjuster Bolt
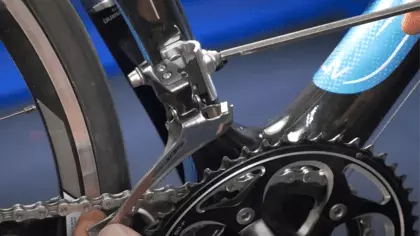
Before you do anything else, look at where the front derailleur cage is in relation to the largest chainring.
The cage ought to line up parallel with the chainring and ought to sit around two millimeters over the teeth of the large chainring. There are no specific engineering and design capabilities for the smallest ring.
If the cage is not parallel, release the bolt where the front derailleur connects to the frame—it may be a clamp-on or bolt-on style—and alter it as needed.
Making barrel adjustments with the derailleur clamp bolt and outer chainring prevents small increments. Thus neither a big ring nor a small chainring will stop intermittent rubbing noise.
It’s vital to check if the cage is bowed since that may cause the chain to rub. If that’s the case, you may require a new one.
Tighten the High Gear Limit Screw
In a front derailleur, there are two adjustable screws that limit how far the front derailleur cage can move to the left and right around the chainring. These are the high-limit screws and low-limit screws.
The two limit screws are side-by-side on top of the front derailleur’s main body and should be easily visible.
The limit screws are frequently, but not always, labeled with an “L” for low and an “H” for high. The H (high) restrain screw limits how far outward the derailleur cage can move absent from your bicycle.
To prepare for alteration, move the chain onto the biggest chainring and littlest raise cog, and incrementally shift the cable pressure by pulling on it over where it interfaces to the front derailleur to form beyond any doubt the cage in its peripheral increases.
The external edge of the cage ought to sit exceptionally near to the outside of the chain except for rubbing.
In case the chain is rubbing in there, back the H screw out in small increments anti-clockwise until there’s a sufficient gap. Don’t forget to drag on the shifter cable wire for more precision!
If a crevice shows up as well, turn the H screw clockwise in little increases. At that point, test how good the derailleur upshifts on the biggest chainring and alter the H screw if required.
Shift to the Second-highest Gear
Most of the time, this is caused by a derailleur constraint limit screw that isn’t set up correctly. These need to be fixed and can be caused by a bowed derailleur holder.
The bicycle must shift gears when the chain rotates forward and cannot shift gears at rest or in reverse.
Only when running forward, can the derailleur normally switch the gear where the chain is located. The derailleur cannot move in a stationary state.
The chain cannot complete shifting, making it very easy to “drop the chain” by operating the derailleur in the reverse state. The torque should be limited during the shifting process.
The pedals should be kept rotating. Otherwise, the chain and gears will be damaged during the gear shifting process.
Also Read: Best chain for fixed gear
Shift the Front Derailleur
The front derailleur relies on proper tuning and smooth running of the cables to function properly.
When you move the shift lever on the handlebar to the gear position, the front derailleur will put the chain on the corresponding gear or ring gear, and the gear will run well.
First, look at the points of the front derailleur installation. Open the installation fastening screw of the front derailleur and install the seat while it is open.
Second, put the front derailleur into the seat tube. Close the seat mounting and gently tighten the screws on the mounting by hand.
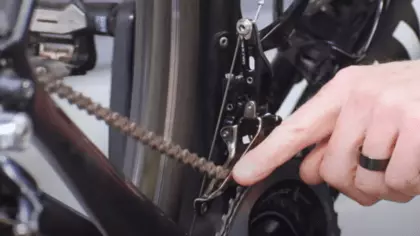
Third, adjust the paddles of the front derailleur so that they are parallel to the teeth of the crankset.
Fourth, make sure that the clamping block (a long plastic block) in the initial position of the front derailleur is in the corresponding position of the front derailleur.
Then, adjust the upper and lower positions of the front derailleur on the riser so that the installation line on the front derailleur sticker is far from the crankset.
Use a wrench to lock the front derailleur fastening screws when the top of the teeth on the largest platter is about 1-2 mm.
After that, turn the fine-tuning screw of the dial that controls the front derailleur clockwise to the end, then back out 1.5 turns, and adjust the dial to the gear of the largest crankset (3rd gear).
Install the shifting cable in place along with the frame, and finally, connect the shifting cable end to the shifting cable locking screw on the front derailleur. Gently tighten the shifting cable, then lock it.
The final step is to pull out the initial position clamping block (plastic block) of the front derailleur to make fine adjustments to the position of the front derailleur. Then you can ride on the road!
Bicycles are our friends, and frequent maintenance and debugging are necessary to keep them healthy and happy. After all, the bicycles we love are our best partners, and caring for them is part of our life as cyclists.
Retighten the Cable Adjuster Bolt
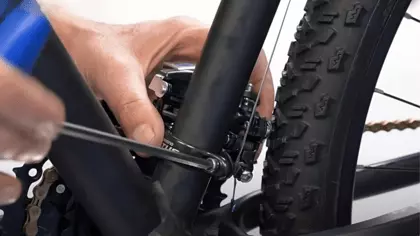
Press and hold your brake calipers so that the brake pads contact the rims. Pull down on the wire so that there is no slack.
Retighten the bolt and thread in the barrel adjuster for the brake cable. A properly adjusted bike with an adjusted bolt is a bonus point.
Now comes a tricky part. If you do the above method without unthreading the barrel adjuster, your pads will probably be “stuck” on your rims, or your rims will contact your pads, and you won’t have a 1-2mm gap between rim and pads.
By unthreading the barrel adjuster for the brake cable before you adjust the cable tension and after you’re done tightening the cable and bolt, then threading the barrel adjuster in, you will have the extra 1-2mm gap, you will need when you’re done tightening your cable.
Also Read: How to tighten a bike chain
Maintenance and Prevention Tips
For starters, the paddle of the front derailleur needs to be parallel to the longitudinal direction of the disc.
The setting height of the front derailleur can refer to the original configuration of a sticker. The front derailleur adjustment is a must to prevent future chain rubbing.
The installation height of the front derailleur needs to be based on the largest tooth in the crankset.
The distance between the front derailleur and the rear derailleur is about 1mm. The space of 3mm ensures the space for the front derailleur to move.
First, adjust the rear derailleur to the largest tooth, and then hang the chain on the smallest disc on the front derailleur to adjust the limit screw.
Usually, there are two adjustment screws, “L” and “H,” on the front derailleur. “L” is the low screw. The position of the screw is different for different models, so check the position of the comparable screw before altering it.
The current gear ratio is the “lightest.” Adjust the position of the front derailleur from the chain by adjusting the low screw.
The distance between the front derailleur and the chain should be as close as possible but not in contact with the chain.
The best distance is usually in the range of 0–0.5mm. After adjusting the position of the low screw, you can tighten the front derailleur and proceed to the next step.
Adjust the rear gear to the smallest tooth, then hang the chain to the largest tooth of the big plate to adjust the limit screw. Know the position of the corresponding screws.
The current transmission gear ratio is the heaviest. Adjust the position between the front derailleur and the chain by adjusting the high-position screw.
The distance between the front derailleur and the chain should be as close as possible but not in contact with the chain.
The best distance is between 0–0.5mm This step is very important; it limits the chance that the front derailleur control chain will fall out due to vibration and shifting).
By adjusting the distance between the limit stops between “L” and “H,” you can adjust the correct tension of the front derailleur.
Adjust the rear derailleur to the largest tooth. When the front derailleur hangs the chain to the middle position, the front derailleur may still rub against the chain, which is usually caused by the incorrect tension of the shifting cable.
The current transmission gear ratio is the lightest gear of the middle plate. Adjust the tension by adjusting the fine-tuning knob on the left finger dial.
As shown in the figure, by rotating the knob counterclockwise, the tension of the shifting cable will increase, and the front derailleur will also be pushed in the direction of the larger plate.
If you rotate the knob clockwise, the tension of the shifting cable will be weakened, and the front derailleur will also retreat in the direction of the small dial. The best position between the front derailleur and the chain is between 0–0.5mm.
Also Read: Why does my bicycle chain keep clicking
Preventive Measures to Chain Rubs on Front Derailleur
Regardless of the type of chain used, in order to maximize the life of the chain drive system, some tips are recommended:
When shifting, try to avoid extreme gear combinations such as the smallest gear with the smallest flywheel or the largest gear with the biggest flywheel.
Please try to maintain the verticality of the chain between the largest chainring and the flywheel when shifting. (For example, don’t use extreme gears such as the smallest sprocket with the smallest sprocket or the largest sprocket with the largest sprocket.)
When shifting, consider the road conditions in advance. (For example, when going uphill, upshift early to avoid excessive force on the chain when changing gears.)
Before stopping, please change to the smallest chainring to avoid the need to change speed when stationary. All themes are essential for front derailleur adjustments.
When Should the Chain be Replaced?
The general standard is to change the chain after every 3,000–5,000km. If an enthusiast rides at 1,000km per month (about 250km per week), they need to change the chain two or three times a year.
Here’s an easy tip: whenever your chain wears down to about 0.75 percent on a chain with fewer than ten gears, you should replace it. You should probably change your chain if it has worn down to 0.5 percent on an eleven- or twelve-speed chain.
Conclusion
At the end of a bike ride, you may occasionally notice that your chain rubs on front derailleur. It may happen in both new bikes and old bikes. However, you must be aware of how to make one more adjustment in order to avoid this happening in the future.
By lubricating and cleaning your bike’s chain on a regular basis, you will suffer far fewer problems with chain rubbing on your front derailleur than you would otherwise.

Steve Beck is a passionate cyclist and experienced writer covering the cycling industry for over a decade. He has a wealth of knowledge and expertise in all bike-related things, from the latest products and technologies to the best routes and trails. His articles are well-researched, informative, and engaging, and he has a talent for explaining complex cycling concepts in a way that is easy to understand. Steve can be found on the road when he’s not writing about bikes, putting his knowledge and skills to the test.

